Easy faux-robin egg craft project.
How do you like your eggs? Scrambled..? Over easy..? PLASTIC..?
Um, no thanks for these.


Gather up a whole bunch of plastic Easter eggs.
Glue the sides together. I think the finished product looks better with the eggs that come in a top and bottom half, as opposed to two equal sides.
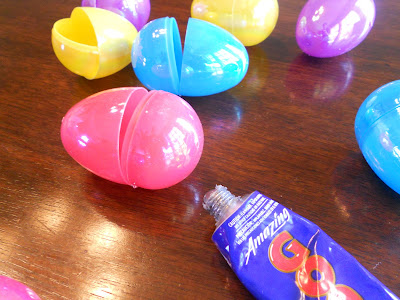
I used Amazing Goop, but any glue, even regular old Elmer’s would work.
Once they’re dry, take them out to your scary spray painting area and give them a good shot of plastic primer. (This is important if you would like to keep the rest of your paint on the egg, as opposed to having it chip or smear off.)

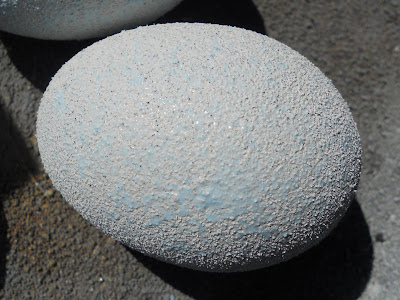
Once they’re coated with the primer and have had time to dry, you add the base coat. I used Fleck Stone, but any textured spray paint will do, as long as it has some texture to it. It is important to help hide the little seam in the plastic where the two halves fit together.
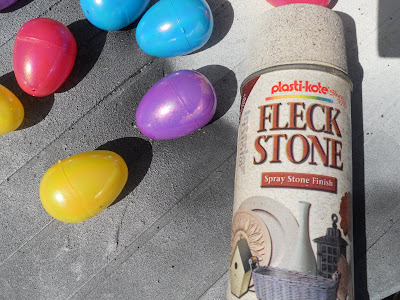
You can also use the Rustoleum Hammered Finish spray paint instead.

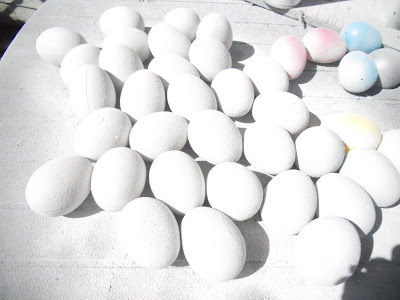
Spray the eggs and let them dry. Then turn them over and hit the remaining sides.
I wedged them together for this portion of the project. They are so light weight that the force from the spray can was blowing them around. This helped to keep them from rolling away.
You can separate them to keep them from sticking.
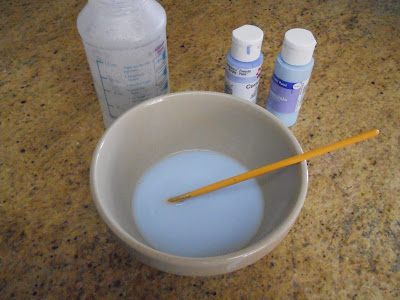
While they dry, get ready for the next step. Gather some light blue acrylic paint and a spray bottle.
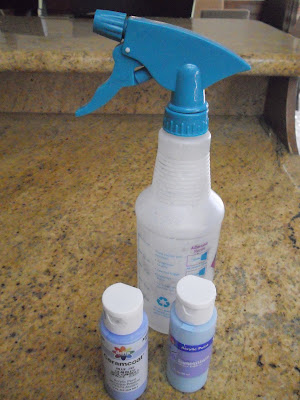
Water down some paint. This is tricky. You don’t want it too watery, but you don’t want it too thick either. It is going to need to be thin enough to be sprayed but thick enough not to run.
Back to the eggs.
By the way, this is the Rustoleum Hammered Finish Egg:
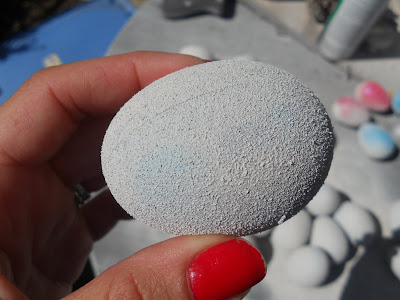
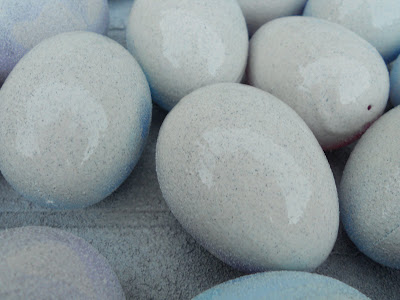
This is the Fleck-Stone egg:
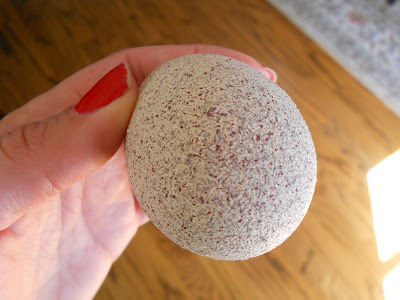
I just like the Fleck-Stone finish better.
Anyhow, back to adding the Robin’s egg blue. Lightly mist the watered down blue paint over the eggs.
It will take several coats, allowing the misted paint to dry in between coats.
If you get all jumpy and impatient because you’re trying to rush the process in order to get a blog post done, this will happen.
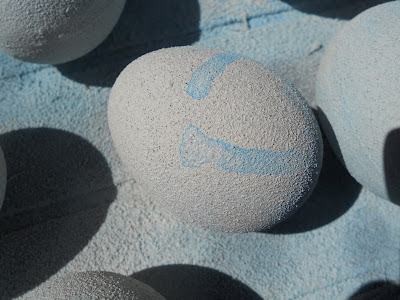
Don’t be impatient. (By the way, this can be fixed by getting a little of the watered down paint on a Q-tip and dabbing away at the drips.) I don’t paint all of the eggs blue. Some of them I leave only barely misted with the blue.
When they’re done, they should look like this.

I love this old bird’s nest!

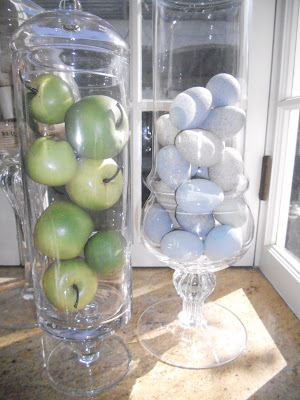
I put them in apothecary jars too….
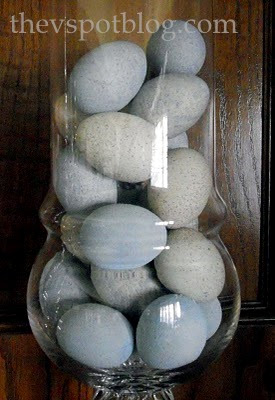

TIP OF THE DAY: The jars in my kitchen window get a lot of the afternoon sun which could turn them into little greenhouses and get them all steamed up.
To prevent the build up of moisture, I open up those little packets of silica gel and pour them in. (You know the ones that come in new handbags or in shoe boxes? Do Not Eat.) Check out this tip.
They’re clear and tiny and no one can see them at the bottom of the glass jars, but they absorb all of the moisture. Fabulous.
Anyway, that’s how you turn a fluorescent plastic egg into a Robin’s egg. Ta-da!
This project comes in at under $5:
The Math: (and yes, I did break out the calculator for the fractions. shut up shut up shut up)
The plastic eggs can be purchased at the Dollar Store ($1) I used 1/8 of a can of plastic primer (approx 60 cents) half a can of fleck stone paint (approx $3) and about a tsp of acrylic paint I already had (20 cents) So basically, a dozen eggs cost me $4.80
Cool!! They look like a giant version of my favorite candy.
Now I want candy.
Now i want candy too. BECAUSE you Said candy
these are really good . i love the way you have them displayed…
Learned two new things today: plastic primer!?!? What? Gotta get me some of that! Second, silica gel actually has a purpose.
Looks great!!
I remember these!!! You know how many plastic eggs I have been collecting to do this?! 🙂
That is so cool! They look beautiful! Hugs, Bobbi Jo
So pretty! I love how it came out! I am visiting from Someday Crafts and I am a new follower!
Have a fantastic day!
Michelle
http://www.delicateconstruction.blogspot.com
Can I just buy a finished batch from you? That looks like entirely too much work, remember I’m the one with the patience of an anorexic gnat!
I’m with Shawn. That’s a lot of steps! But, they turn out so cute when YOU do them so I’d just rather buy them from you so I know they’re perfect. Go ahead and mail me some. Easter will be here soon and I don’t have any Easter decor. Don’t judge me either.
I love these.. They’re beautiful! I know my readers would love to see the tutorial of how to make these as well. I have a blog hop every Mon & Wed (2 different ones) & we would love to have you join us. I love the muted colors & texture..Have a great day..Great Job!!
Barb
I thought you said this was easy…..
you know me momma- I can’t handle that many steps!
~Becca
Love these, you can’t see the lines on the eggs. That was always my problem. Great idea!
Wonderful idea!!!!! I absolutely adore it. Adding this to the list. Maybe it will be a girls spring craft day project. Great moisture tip too.
Wow! I have no idea if I have the patience for all those steps (thinking not), but those look fabulous! Great job!
I liked this idea until I saw it in the apothecary jar…then I LOVED it!! And I have a real obsession with spray painting, so might have to try this too!!
And thanks for following my blog! :-))
Great idea! I love the speckled paint.
Gorgeous! Love the speckled paint too!
Hugs
SueAnn
Man you are just one creative mama. Those are just adorable!!!! And thanks for the tip…I would have never thought of that. Ahh sun…I need some of that right now.
What an awesome idea! I’m saving this one for next year’s Easter. Can’t wait until all those plastic eggs go on clearance!
I’m a baby blogger and have become your newest follower…hope you’ll pop on over and watch me grow!
Sue
these are amazing – i love them! better than the bright colored plastic eggs? only about a million times!!
great crafty idea…love how they look. you should link this up to my fridays unfolded party tomorrow!
blessings,
alison
stuff and nonsense
That is so cool. I just told my kids that I wanted to paint the plastic eggs this weekend. Glad you told me about the primer…I would have been so sad if they started chipping.
These are just too cool! I’ve seen a few women in blogland making concrete eggs, but this is, by far, the most creative! Love it! Thanks for sharing … and, thanks for your sweet (and funny)note on my blog about my mudroom. I’m your newest follower. 🙂 Becca
http://www.adventuresindecorating1.blogspot.com
Great idea! Thanks for sharing. I have to try this with all those plastic eggs we have!
You get the gold star this week for being the first to link up to the party! 🙂 This is just absolutely such a clever idea and we have about a million plastic eggs in our attic right now that I’m pretty sure are going to be getting a face-lift soon thanks to your fabulous tutorial. Thank you so much for linking this up to Inspiration Friday this week!
Vanessa
Seriously crafty genius!
these look amazing!! Soo glad you stopped by and linked up!!
What a fabulous idea! I wouldn’t have ever known those were plastic eggs if you didn’t show the before pic! They look great!
Thanks for linking up! 🙂
Hi Vivienne. Love the natural look of these eggs. What a great idea and you just make it look so simple.
Thanks for sharing. Hugs…Tracy 🙂
P.S. Hope you stop by and visit. I’m having a giveaway that ends tomorrow.
Awesome! This is just gorgeous. I so want to make some of these – I only have 1,000,000 plastic eggs! Great tutorial. I am follower #300!!!!
Holly
504 Main
These looks great!! Loving it! It will go great with my Spring table items (which are only a few). Thanks for the idea and instructions.
http://lamarkham.blogspot.com/
The eggs are adorable, but the silica trick is brilliant!
What a gorgeous vignette! Juxtapostion at its very best.
I am having an antique auction on my blog. All sorts of lovely and romantic finds looking for a new home. I hope you’ll stop by.
Have a wonderful weekend.
these eggs are so pretty! what a great idea 🙂
Oh my goodness these are awesome! I love them!!!!
They look great. I just bought some plastic eggs as there are so many great ideas on how to cover them.
Super great tutorial! I actually bought some tiny eggs I wanted to do something similar with but didn’t know about the plastic primer, so thanks. 🙂
Wow great tutorial.
~kimberlee
http://www.TheSpunkyDiva.com
Thanks for the faux egg tutorial! I had thought about doing something like this with blown out egg shells but this is a MUCH better option!
Ummmm….FABULOUSNESS!!!! I usually hate the eggs you can find in the store this time of the year, and every now and then happen upon some “natural” looking ones. I don’t know why it never entered my mind to create my own! Thank you so much for the inspiration…this is going on my to-do list this week (and probably will pass it on to my readers too! Will link back to you if I do!). Hopping over from Tatertots and Jello
Great idea! I have about a million plastic eggs sitting around here…
What a great idea! And thanks for the silica gel tip too!
So glad you stopped by and linked up to my Swing into Spring party. Hope to see you again next week.
They turned out lovely! I wouldn’t have thought to use the hammered finish paint…what a great idea.
How absolutely darling!!! This is such a great project- so creative and sweet!! Thanks for sharing this at Feathered Nest Friday~ now following along – nice to meet you! 🙂
I love speckled egg! Nicely done!
Barb
Ooh, these came out gorgeous! I love the nest too! I was just eying different spraypaints today, now I have another idea for them!
http://dojocrafting.blogspot.com
Impressive! I gotta try that too:)
—
Daniela
http://isreview1.blogspot.com
great craft!!!! these are adorable! <3
xoXOxo
Jenn @ Peas & Crayons
This is such an awesome idea! I love how it looks! I am so going to try this asap…thanks for sharing!
I love that these looks so real!!! I am highlighting these at somedaycrafts.blogspot.com
love these eggs!! I will have to give them a try!
Are you kidding me? These are AMAZING!!!! I especially love them displayed in your tall jar. Great tip about the silica gel too! Thanks for some Easter inspiration.
So, so fantastically cute! What a great idea! This is also a fantastic way to beef up the Target dollar spot egg wreath from this year. Awesome tutorial, too! Thanks for sharing.
Love these – they look wonderful and there is no way you could EVER tell they started out as plastic cases!
Visiting from Be Different!
Lowri
Very beautiful and so great for spring without screaming Easter. 🙂 Thanks for linking up!
Oh those are soo cute! I love the idea!! Thanks for sharing!! Have a great week!
What an incredible transformation! I definitely won’t be putting our left-over plastic eggs in the “give to Goodwill” box after this Easter! So glad I saw your linkup at Flamingo Toes! Jenn/Rook No. 17
P.S. Love it so much that I’m going to share a link with my FB readers and also Pin it to my board on Pinterest. Hope it brings some good mojo and new followers your way.
Cheers!
Jenn/Rook No. 17
Great idea, they’re gorgeous!
These are genius! Thanks a million for the tutorial! And for linking up!
I love this project! I can’t wait to try it myself!
Your point about the spray paint blowing the eggs around was especially helpful.
Thanks!
What a cute way to reuse all of those plastic eggs! I never would have thought to paint them. Found you through The House Creative. I’m a new follower of your blog. 🙂
Christina @ The Scrappy Housewife
Great Idea! I will definitely be doing this one and I’ll be sure to link to you on my blog when I do. Thanks!
I am completely impressed, and loving this idea. Having a penchant for bird’s nests, and eggs….I am entranced.
Jen @ Muddy Boot Dreams
Thanks for that tutorial and great idea!! They are so amazing–who knew those little plastic things could be so great!!
Love these and your front yard chandelier too! I’m your newest follower – hope you will stop by my blog and follow me back!!
Have a great week ~
Aimee @
justkiddingaroundatlanta
I totally forgot about gluing the eggs first. I was spray painting some eggs blue and didn’t tape first. It didn’t work as well 🙂
So cute! I am bookmarking this one for sure. Came over from Flamingo Toes’ Linky party. I think I’ll stay awhile and check out your site!
Thanks for the tip on those little silica gel beads! I have had a problem with excess moisture in my jars before. Great idea with the eggs as well! All around just awesome!
Those are darling and you gave some fabulous tips! You are amazing as always 🙂
If I get ambitious enough to decorate for Easter, you better believe I’ll be using this 🙂
I love these!! So creative!! What a wonderful way to use plastic eggs and turn them into chic spring decor!! 🙂 Linking these up on my Easter crafts post @ http://bluerobincottage.blogspot.com
These are gorgeous! The silica gel tip is terrific, too! Thanks for the great tutorial!
So nice!
I believe it should be possible to do something similiar to create faux “stones” and use for decoration as well.
Wonder if they sell plastic primer in this country too…
Terrific and very timely! I was just thinking about where I could purchase some of these eggs for a wreath that I want to put together, but making them is even better. You know everyone has dozens of those eggs lying around. Thanks a million!
They look amazing! I had thought about doing this, but you beat me to it. lol (Honestly, I would have probably forgotten about the primer and have turned the whole thing into a huge craft fail.) Thanks for the awesome tutorial! 🙂
These look amazing!! What a fun idea!!!
Wow!.. I didn’t think anything could make those plastic eggs look good… but you nailed it!.. Great work and thanks for sharing!..
that is so cool, i’m gonna have to make some! thanks for sharing this at my party!!!
This is amazing! I would never know how to do this without this tutorial, love it! Thanks for linking up!
So cute!!
I featured it on my holiday blog.
Here’s the link:
http://celebrationsandholidays.blogspot.com/2011/03/faux-robin-eggs-by-v-spot.html
That is the cutest idea.. I am a new follower for sure! I have a bag of those eggs in the waiting.. and I think I even have some paint.. I love to spray paint anything..
REALLY????h my gosh I love it! The eggs are wonderful fun…I am running out to get my fleck spray…
Marking myself as a follower…gotta go now………be back soon!
You have inspired me! Thank you so much for this. I am drying my eggs as we speak! Please visit me anytime at http://twogingerprinces.blogspot.com/I'll also let you know when me project is complete!
love these eggs! great tute and great tip about the moisture!
gail
ps could you change the link on my “I was caught” button so it links to my blog when you get a chance?
thanks!
I had to do a double take when I was looking at the before and after! That is so amazing! Loving all of your great ideas! 🙂
Wow, those came out so great!! Thanks for showing what the textured paint looks like up close….I might just bookmark this post so I can refer to it when I consider using the different sprays. Thanks linking up to A Marvelous Mess!!
http://marvelouslymessy.blogspot.com
Wow those turned out great! I was just looking at those horrible plastic eggs the other day wondering if I could turn them into something decent lol.
I wanted to let you know that I featured this project on my blog!! You can see it here: http://marvelouslymessy.blogspot.com/2011/03/marvelous-mess-4-features.html
Brilliant ideas . The eggs and the silica in the jars! Lovely. Thanks so much for linking up at my Open House!
Those look so real, nice job! I’m going to have to link to you…hope you don’t mind! :o)
hey i found you on frugalishus friday!!! I i had to come over and see how you did this. because i tried this. and it did not work for me! but im thinking the textured paint helps hide that lil seam?? I am going to have to try it:) thanks so much!!!
I WILL be doing this….and pretty much everything else on your blog! Awesome awesome awesome. I will also start stock piling those silica gel packets just in case I have a moisture problem in the future. 🙂
These are great! I love your detailed tutorial too!
http://www.itsybitsypaperblog.com
Out of this world amazing! Love your creativity 😀 I will be featuring you this week on “Amaze Me Monday”
I LOVE THIS!!! Thanks for linking up!! Noticed you hadn’t linked up so jut wanted to remind you 🙂 Sometimes it can get hectic with a thousand tabs open!!!! Thanks again for stopping by my blog!!!!! Have a great weekend!!!!!
These are so cute! You’re so creative! Great job on the egg transformation!
Got everything I needed last night to make these!I am so excited- I will let you know how they turned out!
So I tried it (the eggs) and mine so do not look like yours! But, I still love them. Thanks for the inspiration! Please visit my eggs anytime at http://twogingerprinces.blogspot.com/
Love this idea! Can’t wait to give my plastic eggs a facelift! I featured this on my blog today, feel free to check it out! happy Spring!
Jen
http://jen-simplyliving.blogspot.com/2011/03/stuff-i-like-sunday-7-8.html
forgot you used plastic primer.. off to the dollar tree for more eggs .. this time w/ primer. I will not give up.. love those eggs
I hope I can find all my plastic eggs! Love this idea!
Oh wow I love this! Such a great idea, thanks for sharing. I would have never thought of that!
-Karli
http://www.dancingaroundwithkarli.blogspot.com
Those are amazing, and thank you for the tip on keeping moisture out. Thank you for linking up to More The Merrier.
Great way to pretty up those bright plastic eggs! They look really nice in the apothecary jar.
Thanks for the tip about the silica gel – never would have thought of that!
So cute! Was that a real bird’s nest that you picked up?
You could put something in the egg (like sand or dirt) so they don’t roll away).
Katharine
Hi!
I featured you this week on Make Something Mondays!! Thanks so much for creating such wonderful things!!
-Sarah
http://sarahndipities.blogspot.com/2011/03/make-something-monday-link-party-3.html
This comment has been removed by the author.
WOW, wow, wow!!! That is so clever!! And they look fantastic! 🙂
Wow those are awesome! Thanks so much for sharing the technique!!
Hi Vivienne!
I featured these today!
http://kim-toomuchtimeonmyhands.blogspot.com/2011/03/spring-inspiration.html
Now, off to try my own….
Kim
Awesome! If I can locate the paint, etc. here is this teeny town, I just have to try this!!! I was looking at the plastic eggs the other day and wondering if I should pick some up and dabble with painting them. Thanks for showing how to make these! If I do and post them I will be sure to link back to you.
Faye
(wildrosevinatge)
Thanks so much for this post! I have been wanting some eggs but didn’t want to pay! Lucky for me I have all the tools here! I will be painting today and trying to get a tiffany blue color! I will let you know how it turns out!
Lacy
You were featured today at Today’s Top 20! I’d love if you stopped by!
Amanda
http://www.todaystoptwenty.blogspot.com
I love this idea! I featured it on Hoo’s got talent! Thanks for linking to the party!
Hi
Just wanted to let you know that I “ Featured” you on Santa’s Gift Shoppe Blog Hop today for your great project & inspiration! Be sure to grab the “I was featured” on Santa’s Gift Shoppe Button/Code for your sidebar! You deserve it! Thanks so much..If you’re not a follower already we’d love for you to join us..We are having a Free vinyl Giveaway this week & would love for you to enter to win..Have a WONDERFUL Week!!
Barb
HAHA this is just brilliant!!! they are too cute!
Oh my word! What a clever idea. I am definately going to try this. Great job!
So darling! Thanks for linking! I’ll be featuring this on BCD on April 2nd.
This is great! I wanted to make eggs and my son wants to paint them orange. So I was trying to figure out to do it and this looks like a great way!! Thanks for sharing!
OH MY GOSH!!! I have been wanting some eggs but refused to pay the price in the craft store….and I already have those plastic ones! Thanks for the tutorial, I will be ON it!!!
I really like this idea. Another interesting way of decorative Easter eggs:)
Those turned out soooo cute! I love ’em. I really like them in the apothecary jar.
THanks for linking up to my party! 🙂
Traci
Too funny! I was painting plastic eggs yesterday too (primed & painted gold
), but some were hanging and most were after I glued them to a wreath. All your individual ones took time to do and look great! Kudos to you for having the patience!! I like them displayed in the glass jars.
Good job & Happy Spring!
😀 Lynda
Super cute! I can’t wait to break into my egg stash. I love the apothecary jar set up!! Filed this at thecraftersfilebox.com.
I love the textured spray paint look on the eggs! So pretty displayed. Thanks so much for joining in on the Terrific Under Ten Tuesday!
Hi Vivienne! Thanks so much for the great tutorial on those sweet eggs! I’ve been searching for some realistic ones and yours are perfect! I’m saving this tutorial! 🙂
xoxo laurie
Brilliant. Sheer brilliance.
You are flipping amazing! I knew I wanted to decorate with plastic eggs but I LOATHE the fake look to them.
Now, I’m off to Home Depot. 🙂
I’ve just GOT to follow you now!
~K
bigklittlea.blogspot.com
I tried to make these last night but have to start over tonight – I think I used too dark of a blue and it made like big splatters of blue paint. I’m going to lighten up the blue with some white paint hopefully and hopefully have a better outcome tonight! It’s the last thing I need for a Spring wreath I’m working on 🙂
Thanks for the tips, I got them to work and they turned out beautifully! I posted my wreath with a link to your blog for the eggs. Thanks so much for the tutorial!
http://erraticallyelizabeth.blogspot.com/2011/04/spring-wreath-my-1st-wreath.html
genius
oh my gosh, so adorable. I am making some this weekend!
Amazing!! Thanks for auditioning for American Crafter- good luck:)
I’m trying to make some of your eggs(LOL, crazy in July, right??) for an egg basket for my kitchen. I can’t seem to hide the seam, though. Can you please tell me, does the paint do that, and if so, how many coats did it take you to include primer, and stone fleck? TIA so much. 🙂
Kat
Argh! Kat! I hope you read this… You don’t have a profile or your email enabled. To hide the seam, try running a little glue around the seam and let it slop over a little bit. Run your finger over it to smooth it out. When it dries, it should help to fill the gap the seam makes. Then, the fleck paint should help to provide some texture to mask the seam. Good luck! (And enable your email when you’re done!) 😉
I’m sorry about the lack of email. I didn’t see where to leave it. I just clicked “comment” and got the little blogger comment box with the “choose an identity”, but I don’t know what open ID is, and can’t remember my Google stuff to save my life lol.
I did read your message, though–thanks SO much for trying to help me. 🙂 I had already put the glue on, and smoothed it w/a paint brush before I posted here, but the seam is still pretty evident, in fact VERY evident. Hoping the fleck will take care of it, and if not, well I’ll try and defeat it some other way.
Thanks again, and I hope my email address shows up where the URL is supposed to go. Not sure where else to leave it. :/
Hi Kat, you will need to either create a google profile (or remember your log in info) then go into settings and choose “enable email”
OR
simply leave your email at the end of your comment (particularly if you are asking a question)
I am always so happy to hear when people give my tutorials a try and I am always so disappointed if they ask a question and there is no way for me to reach them with an answer. I’m glad this worked out. Good luck with the seam. That is one of the nice things about fleck paint… the texture helps to hide it. 🙂
I appreciate you trying to help me! 🙂 Ya know, I remember seeing a tutorial way back in Spring, maybe even yours, and I told myself I’d remember where it was because I’d been wanting to make some eggs for this egg basket I have for a couple month at that point. And then recently(June I think), I saw *your* tutorial on another blog(I’m sorry, I don’t remember which one), and I knew I was supposed to follow it to make these.
Progress update: I’ve added a layer of fleck paint, and still seeing the seam, so I may try a different glue. Just have to find one. Maybe wood glue(o plastic, lol ;). Otherwise, they have the exact texture I want! 🙂 Just that seam….
Going to paint them white and brown when I’m done with the seam. 🙂
Thanks for everything, Vivienne! 🙂
Kat
wife_mom_kat_71@live.com
I can’t wait for the plastic Easter eggs to hit the shelves!!! I’m doing this – and I’ve already decided on the baskets I’m making this year for the children – I’m so excited!!!
I love this tutorial and am SO excited to go and try it!!!! Thanks.
Thank you! Have fun!
I tried to spray paint my eggs and they flew all over the box. I couldn’t get coverage on them. Any suggestions? Great post and congrats on the whole Martha thing. 🙂
You might be holding the sprayer too close to the eggs. Try holding it back a little bit and doing several lighter coats, rather than heavy coats.
so the flex stone egg in the picture, does the speckles from the paint come out like that or did you use paint on them too?